
Now that my 12 Days of Christmas Snacktivities series is complete (which you HAVE to check out- you have a week until the big day- so you’ve got to try some of these quick, easy and fun treats with the kids!), I am back to my crafting ways!
I made a super-easy and super-cute Christmas tree garland, using some card stock and a bunch of stuff that I had kicking around the house!
 Pardon the dark photos- I was a little bit rushed on the editing today! See that white stuff? It was quite distracting… in the best kind of way.
Cute garland though- isn’t it??? Here is how I made it!
 I got myself 3 different shades and patterns of green card stock (you could use one color or five- and I just bought this stuff from the dollar store!), and I grabbed some gold card stock for the trunk. I cut out trunks and some triangles that were around 4 inches high and 3 inches wide.
I saved all of my uneven scraps to use for another awesome Christmas project that I will be sharing in the next couple of days- so hoard those scraps!
 What a nice green forest. But they are in desperate need for something:
 Buttttttonnnnnnns! So grab your biggest jar of buttons, and pick out some good ones!

I just used white glue to stick 3 buttons to each tree and to glue the trunk on. Originally I was simply going to glue just one yellow or gold button to the top of the tree- that would have been cute too!

I made 6 of each colored tree for this garland- so 18 trees all together, which was a perfect size to string above my front window!
 This is a perfect craft to involve the kids and/or husband.
 Out of my (literally) hundreds of decorative choices, my son chose to decorate his Christmas trees… with Christmas trees. Hahaha! I love him!
 He was so proud and had us hang it in his room right away 🙂
Speaking of hanging…
 This is the easiest garland I’ve ever strung! No sewing or threading required! Just lay out your trees, get a long enough piece of ribbon and some scotch tape…
 …and tape the ribbon to the backs of your trees! Make sure to stick the ribbon on the top half of the tree to ensure it will hang nicely and not get all twisty.

This garland complemented our first snowy day pretty well. I love the snow. I love Christmas.
I hope you all have a perfect week-before-Christmas!!! ONLY A WEEEEEK 😀
Happy tree-stringing and carol-singing!
OH!!! I JUST got more of my Stand Mixer charms in the mail- So now I can restock my Stand Mixer Earrings:

I’ve been waiting- and I know a lot of you have been waiting for these too!! I sold out so quickly once they were shared by some lovely ladies at Buttercream Couture and Sweetopia, but I have some new ones! I guess I will be making earrings today! Check out my Etsy Shop for interesting art and jewelry- or just be entertained by some of the descriptions… hehe.
~Dot
 MMmmmm delicious AND nutritious- plain gelatin and bird seed!
 In a small pot, mix one packet of gelatin with 1/4 of a cup of water, and bring to a simmer. Stir it around until it is dissolved, take it off the heat and then add some…
 birdseed. 3/4 of a cup of bird seed!
 Stir it up! If there is any moisture left on the bottom of the pan, just add a bit more seed. Now set this aside for a bit too cool down. Meanwhile…
 Line a tray with parchment paper (man I should seriously be getting paid by Mr. Parchment for the amount I have been using in this series!) and choose some Christmassy (or not Christmassy, if you are reading this at a non- Christmassy time!) cookie cutters to place on the tray.
 Next, prepare some hangers for these hanging bird treats. Just take around 6 inches of twine, string or yarn of any kind and fold it in half and tie it like that!
 Now, fill the cookie cutters halfway with the seed mixture, making sure to press it in pretty firmly.
 Next, lay the hanger over the half-filled cutter.
 Fill the cutter the rest of the way up, again, making sure to press it in pretty firmly.
 Awww! Good job kiddos!
 Cuz she’s a bird, duh.
 Which made for an amazing week of bird and other-visitors! My kids were watching out the window like it was T.V!
 I was really surprised at how sturdy these things wound up!!! Aren’t they neat!?!?
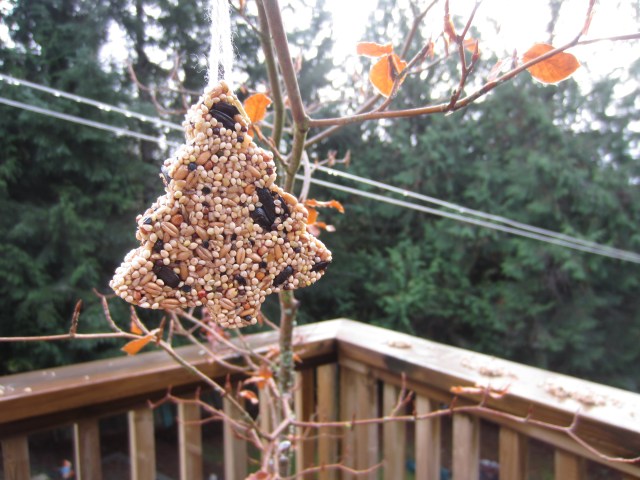
 This Stellar’s Jay is one of my fave birds! I used to see em in my back yard all the time growing up, but I haven’t seen one in the 11 years since I’ve left home- but now that I’m back out of the City, they come visit all the time!!! 🙂
 We had a lot of squirrel-interest too!
 Cute lil birdies 🙂
 I tried to get a better photo of this black squirrel. His tail was sooooooo nasty looking!!!! It looked like a gross, bare, mangy twig!
 Chocolate-dipped Oreo Pops!!!!! Easy as anything, and super fun as usual!
 Alll you need for this snacktivity issss a box of Oreos (DOUBLE STUF!!!!! This is important!), some dark and/or white chocolate for dipping, and some various decorations! And a pregnant belly! Hi Flora Nightingale! She was my child-helper this time 😉
 Step 1: Stab (DOUBLE STUF!!!) Oreos with a lolly pop stick or thin popsicle stick (Like I did in my
  Step 3: Dip the Oreos! I didn’t have enough chocolate to full-on dip each one, so I mostly just dipped one side at a time, and it worked out pretty well!
 Step 4: Keep on dipping, and lay the dipped oreos on a parchment-lined tray.
 Step 5: While the chocolate is still wet, add some decorations! I used chocolate sprinkles, crushed candy canes, and contrasting chocolate- but you can use your imagination!
 I made these for my son’s class, and they fit perfectly on my mini cupcake carrier! How convenient!
 They look pretty darn cute propped up in a Christmas mug too 😉

